Transforming Homes with Professional Painting Services • Licensed • Bonded • Insured
Transforming Homes with Professional Painting Services • Licensed • Bonded • Insured

How to Tape Drywall Seams Without Cracks or Bubbles
Taping drywall seams is the process of reinforcing the joints between drywall panels and covering them with joint compound so the finished wall looks like one continuous surface. The tape helps reduce the chance of the joint cracking, while the compound fills the joint and gradually blends it into the surrounding drywall.
The basic process of how to tape drywall seams is straightforward: prepare the joint, apply joint compound, embed drywall tape, remove excess compound, let the material dry, then apply additional coats that are wider and thinner than the previous coat. After the final coat dries, the seam is lightly sanded and inspected before primer and paint are applied.
The difficult part is not putting tape over a joint. It is getting the tape fully embedded, keeping the compound under control, feathering the edges far enough and knowing when the surface is actually ready for the next coat.
TL;DR
- Drywall tape reinforces joints. It helps bridge the joint between drywall panels and provides a more stable surface for the joint compound.
- Joint compound hides the tape and levels the joint. Several thin applications generally produce a smoother result than one thick application.
- Paper and mesh tape work differently. Paper tape is commonly embedded in joint compound, while fiberglass mesh tape has an adhesive side and is often used with appropriate setting type compound.
- Most flat seams require multiple coats. The first coat embeds the tape. Later coats widen and smooth the joint.
- Drying time varies. Temperature, humidity, ventilation, compound type and application thickness can all affect how quickly the compound is ready for another step.
- Visible seams usually result from poor feathering, insufficient finishing, excessive compound, inadequate sanding or lighting that exposes surface irregularities.
- The goal is not a perfectly flat strip of mud. A properly finished seam should transition gradually into the surrounding drywall so the joint is difficult to detect after priming and painting.
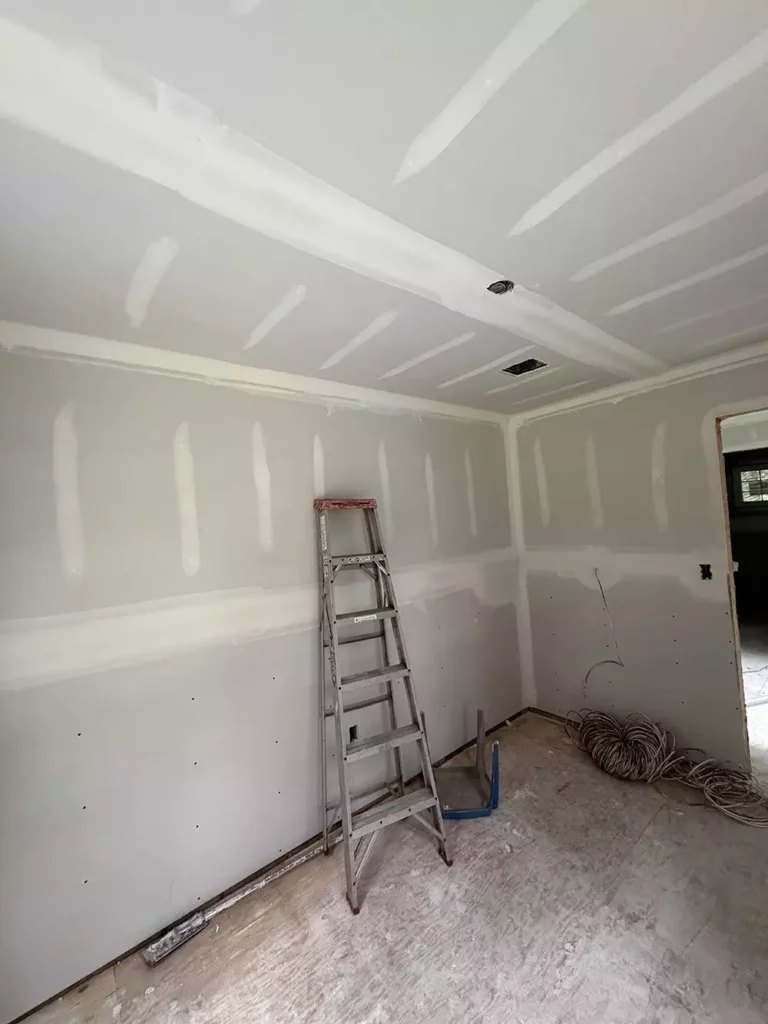
What Is Drywall Seam Taping?
Drywall panels are installed with joints where their edges meet. Even when the panels are installed correctly, those joints need to be reinforced and finished before the wall can be painted.
Drywall tape sits over the joint and works with joint compound to form a reinforced transition between panels. Without appropriate reinforcement, movement in the drywall assembly can contribute to cracking along the joint.
The compound has a different job. It fills low areas, covers the tape and allows the transition to be widened gradually. A good finish therefore depends on both materials working together.
There is an important distinction between taping and finishing. Embedding the tape is only the beginning. The following coats determine how well the seam disappears into the wall.
A properly finished joint should have no obvious ridge at the center and no abrupt edge where the compound ends. Run your hand across the area after the final sanding. You should feel a gradual transition rather than a raised strip or sharp boundary.
Tools and Materials You Need
You do not need a large collection of specialized equipment for a basic drywall seam, but using the right tools makes the work much easier.
- Drywall tape: Choose paper or fiberglass mesh tape based on the joint and the compound you plan to use.
- Joint compound: Premixed compound is convenient for general finishing. Setting type compound comes as a powder that is mixed with water and hardens chemically. It can be useful for certain repairs and situations where a quicker working sequence is desirable, but it must be mixed and handled according to its instructions.
- Taping knife: A wider knife helps spread compound over a larger area during the finishing coats. A smaller knife is useful for applying compound and working in tighter areas.
- Mud pan: A clean pan gives you a manageable amount of compound to work with and makes it easier to keep the knife edge clean.
- Utility knife: Useful for trimming damaged drywall paper, cutting tape and cleaning up loose material.
- Sanding sponge or drywall sandpaper: Used after the compound has dried. Sanding should remove ridges and imperfections without unnecessarily cutting into the drywall paper or tape.
- Clean water and a damp sponge: These can help with cleanup and, depending on the compound and technique, minor surface smoothing. Do not saturate drywall.
Clean tools matter more than many beginners expect. Dried pieces of compound stuck to a knife can leave scratches and ridges in an otherwise smooth coat.
Paper Tape vs Mesh Tape
Paper and fiberglass mesh tape are both used for drywall joints, but they are not interchangeable in every situation.
Paper tape is non adhesive and is normally embedded into a layer of joint compound. It is widely used for drywall joints and is especially useful for inside corners because it can be folded along the center crease. Proper embedding is critical because trapped air can cause bubbles or loose sections.
Mesh tape is made from fiberglass and has an open weave. Many mesh tapes have an adhesive backing, allowing them to stick directly to the drywall before compound is applied. Mesh tape can be convenient and is often useful for repairs, but the compound used with it matters. Setting type compound is commonly paired with mesh tape because of the way the materials work together.
Neither type should be treated as a universal solution. Follow the instructions for the specific tape and compound being used, particularly when combining mesh tape with setting type material.
Looking for a Trusted Painting Team?
Planning a painting project? Bear Painters is ready to help with professional service, quality workmanship and results built to last.
How to Tape Drywall Seams Step by Step
1. Prepare the Seam
Start with a clean, stable joint. Remove loose drywall paper, crumbling compound, dust and other material that could interfere with adhesion. If the drywall edge is damaged, repair the damaged area before attempting to finish the joint.
Check that the panels are firmly secured. Tape and compound cannot compensate for drywall that moves excessively when pressed.
For a recessed factory edge, the joint is naturally lower than the face of the drywall, giving you room to apply compound. Butt joints are more challenging because the ends of drywall panels do not have the same recessed profile. They require a wider, more gradual finish to prevent the joint from looking raised.
If the joint is dusty, clean it before applying compound. The surface should be sound and reasonably clean.
Why it matters: Anything loose beneath the tape can compromise the finished joint.
What can go wrong: Applying compound over loose paper or unstable drywall can lead to cracking, bubbling or a repair that fails again.
What the finished preparation should look like: The seam should be clean, stable and free of loose material. There should not be obvious damage that still needs structural repair.
2. Apply Joint Compound
Load a manageable amount of compound onto your taping knife. Spread a layer of compound directly over the joint. The objective is to provide enough material for the tape to become fully embedded without leaving a thick mound of compound.
Keep the application reasonably even. You do not need a large buildup because the later coats will widen the transition.
For a flat joint, work along the length of the seam. Keep the knife at a controlled angle and use consistent pressure. A clean knife edge helps prevent grooves.
Why it matters: The compound beneath the tape gives the tape something to embed into and fills the joint as the tape is pressed into place.
What can go wrong: Too little compound can leave parts of the tape unsupported. Too much compound creates a thick layer that takes longer to dry and requires more sanding.
What the finished layer should look like: There should be enough compound to cover the joint and accommodate the tape, but no unnecessary mound.
3. Embed the Tape
Position the tape over the center of the joint. With paper tape, press it into the wet compound using your taping knife. Start near one end and work along the seam, applying steady pressure. The goal is to push out excess compound and air trapped beneath the tape.
Do not simply place the tape on top of the compound and cover it with another heavy layer. The tape needs to make proper contact with the compound beneath it.
For inside corners, fold paper tape along its crease and press each side into the compound. A corner knife can help, but careful work with a standard taping knife can also produce a good result.
Mesh tape is applied differently because it typically adheres directly to the drywall. Once positioned, the appropriate compound is worked into the mesh.
Why it matters: Proper embedding prevents loose sections and air pockets and helps the tape become part of the finished joint rather than sitting loosely on top.
What can go wrong: Pressing too aggressively can remove too much compound from beneath the tape. Failing to press the tape into the compound can leave hollow areas that may bubble later.
What the finished tape should look like: The tape should lie flat and remain fully supported, with excess compound removed from around it.
4. Apply Additional Coats
Allow the first application to dry or harden according to the compound manufacturer’s instructions before proceeding.
Do not judge readiness only by the surface feeling dry. A thicker application can remain soft underneath. Temperature, humidity, ventilation, compound type and coat thickness all affect drying or setting.
Once ready, apply another coat of compound over the taped joint. This coat should extend beyond the first application. The purpose is to build the transition outward rather than adding more material directly on top of the center.
After the second coat has dried, inspect it and apply another thin coat if necessary. The number of coats depends on the joint, the quality of the previous work, the compound and the finish level desired.
Why it matters: Several controlled coats make it possible to blend the joint gradually into the drywall.
What can go wrong: Applying a thick coat to finish the job quickly often leads to extended drying, heavier sanding and a visible hump.
What the finished coat should look like: The seam should become progressively wider and flatter, with no obvious central ridge.
5. Feather the Edges
Feathering is one of the most important parts of finishing drywall seams. Instead of stopping the compound abruptly, thin the material toward its outer edges. Use a wider knife for later coats and apply more pressure toward the outer portion of the stroke to leave less compound there.
The center of the joint can retain enough material to fill the low area, while the outer edges become increasingly thin.
This is particularly important because a seam that feels acceptable under your hand can still show through paint if its edges are too abrupt.
Butt joints require especially careful feathering because there is no factory recess to accommodate the compound.
Why it matters: Feathering spreads the transition over a wider area, reducing the chance that light will reveal a hard edge.
What can go wrong: Keeping every coat within the same narrow strip creates a raised band that becomes increasingly obvious.
What the finished surface should look like: The transition should be gradual. You should not be able to identify a sharp line where the compound ends.
6. Sand and Inspect
Once the final coat is fully dry or otherwise ready for sanding, use fine drywall sandpaper or a sanding sponge to smooth ridges and imperfections.
Do not aggressively sand the entire seam. Concentrate on raised areas and rough edges. Excessive sanding can remove too much compound and expose the tape or drywall paper.
Use your hand as well as your eyes. Run your palm lightly across the seam to detect ridges or depressions.
Then inspect the joint under the type of lighting the finished wall will receive. Light coming across a wall at a low angle can reveal imperfections that are difficult to see from directly in front.
If you find a low spot, fill it with a thin coat rather than trying to solve the problem by sanding surrounding material excessively.
Why it matters: Sanding is for refining the surface, not for correcting major differences in thickness.
What can go wrong: Aggressive sanding can damage the surface and create another repair problem.
What the finished surface should look like: It should feel smooth and transition naturally into the surrounding drywall without loose dust, ridges or visible tape.
7. Prepare for Primer and Paint
Remove sanding dust before priming. A dusty surface can interfere with the next coating. The repaired area should be fully finished before paint is applied. Primer is particularly useful over fresh joint compound because the compound is porous and can absorb paint differently from the surrounding drywall.
That difference in absorption can produce an uneven appearance, sometimes called flashing, where the repaired areas appear different in sheen or texture after painting.
Painting also makes small imperfections easier to notice under certain lighting conditions. If a seam is visible before paint, do not expect the paint to hide it. Fix the surface first.
Bear Painters can be considered when drywall finishing is part of a larger preparation and painting project, but the same surface preparation principle applies whether the work is done by a homeowner or a contractor: paint should be applied only after the drywall surface is properly finished.
Looking for a Trusted Painting Team?
Planning a painting project? Bear Painters is ready to help with professional service, quality workmanship and results built to last.
Common Drywall Taping Mistakes
1. Using the Wrong Tape or Compound Combination
Different tapes have different installation requirements. A common mistake is treating paper and mesh tape as if they are installed identically.
Avoid it: Read the tape and compound instructions and use a compatible combination.
2. Applying Too Much Joint Compound
A thick coat may seem faster, but it usually creates more sanding and can take longer to dry.
Avoid it: Build the joint with controlled coats. Each coat should serve a purpose rather than simply adding material.
3. Failing to Embed the Tape
Tape that is sitting on top of the compound rather than properly embedded can bubble or become loose.
Avoid it: Press the tape firmly into the compound and remove excess material with the knife.
4. Leaving Ridges
Ridges often come from an uneven knife edge, dried material on the knife or inconsistent pressure.
Avoid it: Keep the knife clean and remove raised material while the compound is workable.
5. Not Feathering the Edges
A narrow, thick application can leave a visible hump.
Avoid it: Make subsequent coats wider and thinner, gradually blending the joint into the surrounding drywall.
6. Sanding Too Aggressively
Heavy sanding can expose tape or damage the drywall surface.
Avoid it: Use sanding to remove small imperfections, then apply another thin coat if the surface is too low.
7. Coating Before the Previous Layer Is Ready
A new layer applied over inadequately dried compound can interfere with the finishing process.
Avoid it: Follow the compound’s instructions and allow adequate drying or setting time under the conditions present.
8. Painting Too Soon
Paint does not reliably hide an improperly finished seam.
Avoid it: Inspect the wall before priming. Fix visible ridges, depressions, exposed tape or rough areas first.
How to Fix Common Drywall Seam Problems
1. Bubbling Tape
Bubbles usually indicate that the tape did not bond properly to the compound beneath it or that air remained trapped under the tape.
Do not simply cover a large bubble with more compound. Cut out or remove the loose section carefully, clean away loose material and retape the affected area using the appropriate method.
Small surface imperfections can sometimes be corrected with compound, but loose tape needs to be properly secured rather than buried.
2. Visible Drywall Seams
If the seam is visible after painting, several things could be responsible. The joint may be too narrow, the edges may not have been feathered sufficiently, the center may be raised or the surface may have been left uneven before painting. Strong side lighting can make even subtle differences much more noticeable.
Inspect the surface under good lighting. If the seam is raised, carefully sand the high area and refinish as needed. If it is low, use a thin coat of compound and feather it outward.
Avoid repeatedly adding compound without first identifying the problem. Otherwise, a low spot can turn into a high spot.
3. Cracked Seams
A crack along a drywall joint can result from movement, a poorly finished joint, inadequate reinforcement or conditions affecting the drywall assembly.
A simple retape may solve a superficial finishing failure, but recurring cracks deserve closer attention. If the same joint repeatedly opens after repair, look beyond the surface.
Check for loose drywall, movement, moisture related damage or other conditions that could be contributing to the failure. Retaping without addressing the cause may only produce another temporary repair.
4. Uneven or Raised Seams
A raised seam is often the result of too much compound being concentrated in the center or insufficient feathering at the edges.
If the compound is sound, lightly sand high areas and apply a wider, thinner coat where needed. Do not keep adding material to the entire joint simply because one section is low.
The finished joint should disappear gradually into the wall rather than looking like a narrow strip laid over the drywall.
5. Excessive Sanding
If you are spending a large amount of time sanding, the problem may have started during application.
Heavy buildup, ridges and poorly feathered edges create unnecessary sanding work.
The better approach is to improve the application technique. Remove excess compound while it is still workable, keep the knife clean and use wider knives for later coats. Good application reduces the amount of correction required afterward.
Looking for a Trusted Painting Team?
Planning a painting project? Bear Painters is ready to help with professional service, quality workmanship and results built to last.
When Should You Hire a Professional?
Taping a small number of straightforward drywall joints can be a reasonable DIY project if you have the time and patience to work through multiple coats and allow the material to dry properly.
Professional drywall finishing may make more sense when the project is large or the finish needs to be particularly consistent. Consider getting help when:
- A large area of drywall needs finishing.
- There are numerous seams throughout a room or home.
- Existing drywall has extensive damage.
- Cracks keep returning after repairs.
- The drywall has been affected by moisture.
- Large holes or damaged sections require replacement.
- There are difficult inside corners or complicated transitions.
- The finished wall will receive strong side lighting that exposes imperfections.
- You are uncomfortable judging when a seam is ready for the next coat.
- You need a smooth surface prepared for painting but do not have enough time for multiple finishing cycles.
There is also a difference between completing the repair and achieving a finish that looks consistent across an entire wall. A homeowner may be able to make a seam structurally sound but still find that the joint remains visible under paint. If the appearance matters, surface finishing deserves as much consideration as the initial repair.
For recurring cracks or damage associated with moisture, the priority should be identifying the underlying problem rather than repeatedly covering the same area.
Conclusion
Successful drywall seam taping depends less on putting a large amount of compound on the wall and more on controlling each stage of the process. The tape needs proper support, the compound needs to be applied in manageable coats and each finishing coat should extend farther and become thinner so the joint gradually disappears into the drywall.
Take your time with preparation and embedding. Keep the knife clean, remove excess compound while it is workable and resist the temptation to solve every imperfection with more mud. Let each coat dry or set properly, then sand only enough to remove ridges and rough areas.
Before primer and paint, inspect the surface from different angles and under the lighting the room will actually have. A seam that looks acceptable straight on may still show a ridge when light hits the wall from the side.
For small, straightforward repairs, careful DIY work can produce a good result. Larger repairs, recurring cracks, moisture damaged drywall or walls where a highly consistent finish is important can justify professional drywall finishing. Bear Painters can be an option when drywall repair and finishing are part of a broader painting project, but the essential lesson remains the same: the quality of the painted wall starts with the condition and preparation of the surface underneath it.
About
Bear Painters provides residential painting services in Walden, NY, and throughout Orange County. We specialize in interior painting, exterior painting, drywall repair and surface prep for homes, offices, retail spaces, rentals and more.